In my last post I connected my Mac to the Hermes on my VPS with the Hermes Desktop app and an SSH tunnel. It worked. Then I looked at my other computer: a Windows laptop from work. And I asked myself: do I really need the app there?
I don’t want to install it. The desktop app sets up a complete second Hermes on the machine (the “this device” gateway from the last post), and I’d rather not put that on a work laptop. But the Hermes on my server also has a browser dashboard. If the tunnel works for the app, it should work for a plain browser. This post checks that: Windows laptop, nothing to install, just the built-in SSH client and a browser.
TL;DR I want to reach the Hermes dashboard on my VPS from a Windows work laptop without installing Hermes Desktop. What this post covers:
- Why it should work: the Hermes docs themselves recommend keeping the dashboard on the server’s loopback and reaching it through an SSH tunnel. The desktop app is just another front end for the same dashboard.
- What I need: Windows’ built-in OpenSSH client, a browser, and a key pair that belongs to this one laptop.
- Steps: check that port 22 is reachable, create a key, add it to the server (for my normal user, not root), write a short SSH config, open the tunnel, open
http://localhost:4860. - Watch out for: mixing up the user name on the laptop and the one on the server, Mac-only lines in the SSH config,
curlbeing an alias in PowerShell, a network that blocks port 22, and the rules of the work laptop itself. - Result: it works. The dashboard, including the Chat tab, ran through the tunnel in a plain browser on the Windows laptop, and I installed nothing.
- Not in this post: Tailscale, a tunnel that doesn’t need an open window, more models, backups. They are collected at the end.
A note on how this post came about. Like the last one, this is a diary, not a security recommendation. SSH keys and tunnels are still not my home turf, and my sidekick Claude Sonnet 5 (medium effort) walked me through it. I can’t judge from the outside how secure the setup is, and nobody has audited it. Don’t put anything on such a server that you can’t afford to lose or leak, and never student data.
Dashboard or desktop app?
Both are windows into the same agent on the server. Here is how they differ for my situation:
| Browser dashboard (via SSH tunnel) | Hermes Desktop (via SSH tunnel) | |
|---|---|---|
| Installation on the laptop | Nothing: built-in SSH client and a browser | A full local Hermes Agent, installed in eleven steps |
| Which agent do I talk to? | Only the one on the server | “This device” and the server, and I have to pick |
| Where does the terminal run? | The Chat tab runs on the server | The terminal pane runs on my Mac, not on the server |
| Admin pages | The full sidebar (Config, Logs, Cron, Channels, System, …) | In my setup, fewer entries than the dashboard |
| Version hint | None, it is the server’s own dashboard | “Backend out of date” (app v0.21.3 vs server 0.21.2) |
One thing that could confuse you: the Hermes docs say the Chat tab needs WSL2 on “native Windows”. That applies when Hermes itself runs on Windows. Mine runs on a Linux server, and the Windows laptop only shows the page. It never runs Hermes.
What you need
- A Windows laptop with the OpenSSH client. The next steps show how to check.
- A browser.
- The running setup from the last two posts, including your server’s IP address, your normal user on the server and the dashboard admin username and password.
Two places, and which one is meant
Every step below starts with a Where line, because this post switches between two places:
- Windows PowerShell: on the laptop. The prompt looks like
PS C:\Users\<laptop-name>>. - Server terminal: the browser terminal in hPanel (see Hostinger’s help page), logged in as root. The prompt looks like
root@srv…:~#. If the terminal says “You are now in Docker container …”, you are inside the Hermes container. Typeexitto get to the server’s own shell.
Two user names, don’t mix them up
The laptop and the server each have their own users:
<laptop-name>is the user of your Windows account (the one inC:\Users\…).<yourname>is the normal user you created on the server in the last post (step 4,adduser). To see its name, typels /homein the server terminal.
I mixed them up at first. See “Where I got stuck” 🤪.
Step 0: Can this laptop reach the server at all?
Where: Windows PowerShell
Before anything else, one check, because everything depends on it. Some company and campus networks could block outgoing SSH (port 22).
Test-NetConnection <SERVER-IP> -Port 22
TcpTestSucceeded : True means the port is reachable. If it says False, the rest of this post won’t work from this network.
My result: True. But I ran this on my home Wi-Fi.
Also a question for yourself: is it allowed to use a private SSH key and a private server from a work device? I can’t answer that for you. Check the rules of your IT department.
Step 1: Is there an SSH client?
Where: Windows PowerShell
ssh -V
If it prints a version, you’re done. Mine printed OpenSSH_for_Windows_9.5p2. If PowerShell doesn’t know the command, the OpenSSH client is an optional Windows feature (Settings → Optional features → OpenSSH Client; the exact menu differs between Windows 10 and 11), and installing it may need admin rights.
Step 2: A key pair for this laptop
Where: Windows PowerShell
Same idea as on the Mac, but a separate key for this device. Then I can remove this laptop’s access later without touching the Mac.
New-Item -ItemType Directory -Force $env:USERPROFILE\.ssh
ssh-keygen -t ed25519 -f $env:USERPROFILE\.ssh\id_ed25519_hermes_work -C "work-windows-hermes-vps"
Set a passphrase (four or five random words from the password manager) and save it there right away. As far as I know, Windows’ ssh-agent service is switched off by default and starting it needs admin rights, so I simply type the passphrase when I open the tunnel.
Test the passphrase right away. The key file is useless if you can’t unlock it, and the server won’t tell you why a login fails. This command checks it locally, without any server:
ssh-keygen -y -f $env:USERPROFILE\.ssh\id_ed25519_hermes_work
It asks for the passphrase. If it is right, the command prints one line starting with ssh-ed25519 AAAA…. If not, it says “incorrect passphrase supplied”. A passphrase that only sits in the password manager and was never tested is exactly what tripped me up (see “Where I got stuck”) 😬.
Step 3: Give the public key to the server
This step has two parts, one on each side.
3a: Copy the public key
Where: Windows PowerShell
Get-Content $env:USERPROFILE\.ssh\id_ed25519_hermes_work.pub | Set-Clipboard
The command prints nothing. The key line (starting with ssh-ed25519, ending with work-windows-hermes-vps) is now in the clipboard.
3b: Add it to my normal user on the server
Where: Server terminal (hPanel browser terminal, as root, not inside the container)
In the last post, hPanel put my key into the root account. For this laptop I don’t want that. Root is not my daily login anymore, so the key goes to my normal user. First look up the user’s name:
ls /home
Then append the key. Type echo ', paste the key line from the clipboard, and finish with the rest of the command. Replace <yourname> with the name from ls /home, without the angle brackets:
echo 'ssh-ed25519 AAAA...your-key... work-windows-hermes-vps' >> /home/<yourname>/.ssh/authorized_keys
- The quotes stay, because the key line contains spaces.
- Use two
>>. A single>would overwrite the file and delete the Mac’s key. - Before you press Enter, look at the start and the end of the line. Pasting into the browser terminal can add stray characters. In my case, a
^[[200~showed up in front of some pasted lines and a~at the end of one, and that key ended up in a different file (see “Where I got stuck”). Always check the result with theawkcommand below.
Check the result:
awk '{print $1, $NF}' /home/<yourname>/.ssh/authorized_keys
It should show two lines: ssh-ed25519 mac-hermes-vps and ssh-ed25519 work-windows-hermes-vps. Mine did.
Step 4: A short name for the server
Where: Windows PowerShell (the file is created on the laptop, it does not live on the server)
The SSH config is a small text file at %USERPROFILE%\.ssh\config. It has to be called exactly config, with no extension. Notepad makes that hard: it likes to append .txt, and Windows Explorer hides file extensions by default, so you may not even notice, but SSH then ignores the file. On the Mac I used nano, but Windows doesn’t ship it, and I don’t want to install anything on this laptop. So I let PowerShell write the file:
@(
"Host hermes-vps",
"    HostName <SERVER-IP>",
"    User <yourname>",
"    IdentityFile ~/.ssh/id_ed25519_hermes_work",
"    IdentitiesOnly yes",
"    ServerAliveInterval 30"
) | Set-Content -Path $env:USERPROFILE\.ssh\config -Encoding ascii
Replace <SERVER-IP> and <yourname> first, in the lines themselves, without the angle brackets. Two details:
- I use
-Encoding asciion purpose. As far as I know, theutf8option of Windows PowerShell 5.1 adds an invisible marker at the start of the file, and SSH may choke on it. Set-Contentreplaces the whole file. If your laptop already has aconfigwith other hosts in it, useAdd-Contentinstead, so nothing is overwritten.
Check that it worked:
Get-ChildItem $env:USERPROFILE\.ssh
ssh -G hermes-vps | Select-String "^(hostname|user|identityfile) "
The first command should list a file called config, not config.txt. The second shows what SSH really reads for hermes-vps: your server’s IP, your server user and the key file. If hostname still says hermes-vps, SSH didn’t find the config. If you already have a config.txt from an earlier try, rename it:
Rename-Item $env:USERPROFILE\.ssh\config.txt config
Three things to get right:
Useris the user on the server from step 3b, not the Windows user name.- There is no
UseKeychainline. That option only exists on macOS, and Windows’ SSH stops with “Bad configuration option” if it finds it. - Replace
<SERVER-IP>with the real address, without the angle brackets 🙈.
Step 5: First login
5a: Log in
Where: Windows PowerShell
ssh hermes-vps
The first time, SSH shows the server’s fingerprint and asks whether to trust it. Before you type yes, compare it with the one on the server.
5b: Compare the fingerprint
Where: Server terminal (host shell, not inside the container)
ssh-keygen -lf /etc/ssh/ssh_host_ed25519_key.pub
If both SHA256: strings match, go back to PowerShell and type yes. Then SSH asks for the passphrase of the Windows key from step 2, and whoami should show your normal user. Type exit to leave the server again.
My result: the fingerprints matched and the login worked.
Step 6: Open the tunnel
Where: Windows PowerShell
ssh -N -o ExitOnForwardFailure=yes -L 4860:127.0.0.1:4860 hermes-vps
It asks for the passphrase, and then it looks like it hangs. That is normal: the tunnel is open. Leave the window open, Ctrl+C closes it.
In a second PowerShell window, check it:
curl.exe -sS http://localhost:4860/api/status
Use curl.exe with the extension. In Windows PowerShell 5.1, plain curl is an alias for something else. As on the Mac, look for "gateway_state":"running", "auth_required":true and "auth_providers":["basic"] in the answer.
My result: a long block of JSON with "version":"0.21.2", "gateway_state":"running", both the API server and Discord listed as "connected", "auth_required":true and "auth_providers":["basic"]. So the tunnel works, and it is the same Hermes that answers in Discord and on the Mac. (Careful: /api/status is a public endpoint. It only proves that the tunnel and the dashboard are up. Whether the chat works comes in the next step.)
Step 7: Open the dashboard in the browser
Where: Browser on the Windows laptop (the tunnel window from step 6 stays open)
Open http://localhost:4860 and sign in with the admin username and password from the Docker Manager. The address bar says http, not https. That is fine here: the browser only talks to the SSH client on the same laptop, and from there everything travels through the encrypted tunnel. When the browser offers to save the password, I say no, because it is a work machine.
Now the test that matters: is this the server’s Hermes, and does the Chat tab work through the tunnel?
- Look at the Sessions page. The chats from Discord and from the Mac should be listed.
- Open the Chat tab and send the same prompt as in the last posts:
Check my current directory and tell me what looks like the main project file.
On the server, the answer is /opt/data.
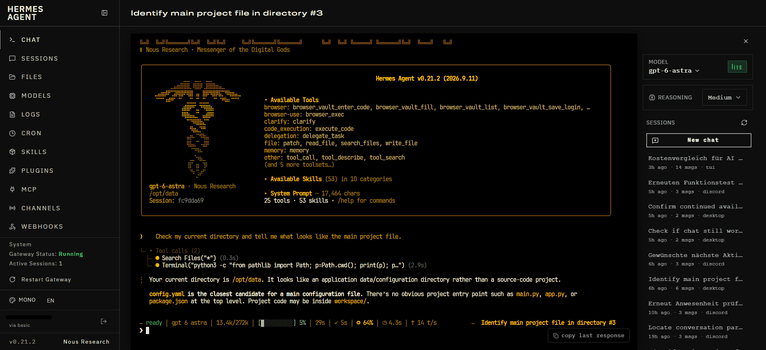
My result: it worked. The Chat tab started through the tunnel.
Using it every day
- Windows PowerShell: start the tunnel (step 6) and leave the window open.
- Browser: open
http://localhost:4860. - When I’m done: sign out of the dashboard (the logout icon in the sidebar), then press Ctrl+C in the tunnel window.
If “address already in use” appears, an old tunnel is still running. In PowerShell, netstat -ano | findstr :4860 shows the process ID in the last column, and taskkill /PID <PID> /F stops it.
The work-laptop caveats
- The private key and the sign-in live on this laptop, so full-disk encryption (BitLocker) and a screen lock matter here as much as FileVault on the Mac.
- If the laptop is ever replaced or reset, I remove its line from
authorized_keyson the server. That is why it has its own key.
Where I got stuck
- “-bash: /home/: Is a directory” when adding the key. I had pasted the command with the placeholder
<yourname>still in it. The shell reads<and>as redirections, so the path came out empty. Fix: use the real user name, without angle brackets (see step 3b) 😬. - “No such file or directory” on the next try. I had used my Windows user name 🦸♀️. The server has its own users, and mine has a different name.
ls /homeon the server shows it (see step 3b). - The terminal opened inside the Hermes container. Its first line said “You are now in Docker container …”. Commands for the server have to run in the host shell, so I typed
exitfirst (see the box “Two places” above). - Notepad wouldn’t save the config without
.txt. I couldn’t get the file name right in the save dialog. Windows has nonano, so PowerShell now writes the file itself (see step 4). - “Permission denied (publickey)” after three passphrase prompts. SSH asked for the passphrase three times and gave up. The passphrase from my password manager was wrong, or belonged to another key 🥇. My passwords were mixed up: the Mac key has its own passphrase, the Windows key another, and the server user’s password is a third one.
ssh-keygen -y -f <key file>checks a passphrase locally, without the server (see step 2). Since I couldn’t find the right one, I made a new key under the same file name, deleted the old line fromauthorized_keysand added the new one. - The new key was not accepted, because it had landed in
authorized_keys~. Pasting into the browser terminal had added a stray~at the end of my command, so the key went into a different file 💪. The check showed only the Mac’s key. Fix: append that file to the right one withcat … >> …, then delete it withrm. Lesson: read the end of the line before you press Enter. - PowerShell commands in the server terminal. I pasted
Remove-Item …into the server terminal by mistake and got “command not found”. Harmless, but it shows why the Where lines matter 🧠. - Pasting into the browser terminal didn’t work at first, and then it added extra characters. The right mouse button → paste finally worked. But stray characters appeared at the start and at the end of the pasted text (for example
^[[200~in front and a~behind), and choosing “paste as plain text” didn’t help. As far as I can tell, these are the “bracketed paste” markers that terminals put around pasted text, and this web terminal shows them instead of hiding them, but I haven’t confirmed that. What I do now: check the start and the end of every pasted line before I press Enter, remove any strays, and verify the result (for example with theawkcheck in step 3b) 🐿️.
What’s next
- A tunnel that doesn’t need an open window. Right now it lives and dies with one PowerShell window.
- Tailscale as an alternative to the SSH tunnel. It would let me close port 22 as well.
- More models. GPT and Claude, open-source models through OpenRouter, and what it all costs.
- Email, calendar and Drive. As a sandbox, with separate accounts.
- Backups and updates. An automated, encrypted copy outside the server, and a careful update of the Hermes container.
- What Hermes is allowed to do. Approval mode and tool permissions.
- …
Sources