In my last post I got Hermes running on a Hostinger VPS and closed everything except Discord and SSH. That works well for chatting. But a chat window only shows me the answers. I also want to see what the agent actually does on the server: which tools it calls, which files it touches, what sits in its settings.
This post is about the one door I left open on purpose: SSH. Below is every step to connect my Mac to the server, in the order I did it, with the screenshots I took along the way.
TL;DR I connected my Mac to the Hermes on my Hostinger VPS without opening anything new to the internet. What this post covers:
- Why: Discord is a chat door. The Hermes Desktop app shows what’s inside (tool calls, files, sessions, cron jobs, settings). Both talk to the same agent on the server.
- SSH: a key pair on my Mac, added in hPanel, and a short alias in
~/.ssh/config. - Tunnel: the dashboard port is pinned to the server’s loopback (
127.0.0.1:4860), and an SSH tunnel carries it to my Mac. - App: Hermes Desktop installs a full local Hermes on the Mac too. The server is added as a Remote gateway (URL
http://localhost:4860, signed in through the OAuth option, which turns into a username and password form) next to “this device”. - Lock-down: a normal user with
sudo, password logins off, root only with a key. hPanel, the browser terminal and the Docker Manager still work. - Watch out for: a first connection test that fails until you sign in again, the terminal pane in the app (it runs on the Mac, not on the server), a “Backend out of date” hint (app v0.21.3 vs server 0.21.2), and the built-in SSH connection type, which doesn’t work with Hermes inside Docker.
- Not in this post: the Windows laptop, more models, email, calendar and Drive, backups, and Hermes’ permissions. I collected them at the end.
A note on how this post came about. Honestly, for a large part of this post I didn’t really know what we were doing. SSH keys, tunnels, firewalls, Docker ports: none of that is my home turf. This post exists because my sidekick, Claude Sonnet 5 (medium effort), walked me through it step by step and helped me solve one stumbling block after another (you’ll find them all in “Where I got stuck”). Without it, I wouldn’t have made it.
That also comes with a caution. I can’t judge how secure this setup is from the outside. I closed the obvious doors (a firewall, key login instead of passwords, a private tunnel), but nobody has audited it. The server still has pending updates, there are no backups yet, and Hermes can run commands on the server without asking me first. So please read this as the diary of a playground, not as a security recommendation. Don’t put anything on such a server that you can’t afford to lose or leak, and never student data.
Why bother with the desktop app?
Discord already gives me Hermes on my phone, so why install anything on the laptop?
Hermes has several front ends that all talk to the same agent: the CLI and terminal UI, the browser dashboard, messaging channels like Discord, and a native Hermes Desktop app for macOS, Windows and Linux. According to the desktop docs, they share the same config, keys, sessions, skills and memory, as long as they are attached to the same backend.
That last part is the catch. By default, the desktop app starts its own Hermes on the laptop. That would be a second, separate agent with its own memory, and not the one on my server. What I want is the other mode: the app as a window into the Hermes that already lives on the VPS. The app calls each Hermes it can reach a gateway, and the local one shows up as “this device”.
Here is how that differs from Discord:
| Discord | Hermes Desktop (via SSH tunnel) | |
|---|---|---|
| What it is | A messaging channel of the Hermes gateway on the server | A full app that attaches to the Hermes on the server |
| Direction | The server dials out to Discord | My laptop dials in through SSH |
| What I see | Mostly text: my messages and Hermes’ replies | Live tool activity, file browser, sessions, cron jobs, skills, settings, model picker |
| Where it works | Anywhere, including my phone | Only on the laptop, and only while the tunnel is open |
| What it’s good for | Quick questions, and Hermes messaging me (for example scheduled task results) | Looking inside, configuring, watching longer tasks |
| Path of the data | Through Discord’s servers | Through the encrypted SSH connection, no extra port opened |
| Setup | Bot, token, allowlist | Key pair, tunnel, app |
They are not competitors. Discord stays for on the go, the desktop app is for when I want to look under the hood. And since the browser dashboard is closed by the firewall now, the tunnel also gives me a private way back into it.
Two ways to connect the app to a server
According to the multi-connection docs, the app offers two relevant connection types:
- Remote gateway: I enter the URL of a running Hermes dashboard and sign in.
- SSH: the app opens the SSH tunnel itself and starts the backend on the server. For that, it needs the
hermescommand in the server’s login shell.
In my setup, Hermes runs inside a Docker container, so as far as I can tell there is no hermes command on the server itself. That’s why I use the first option and open the tunnel by hand. I tried the built-in SSH type as an experiment once the app worked. Spoiler: it doesn’t work with Hermes inside Docker.
What you need
- A Mac with Apple Silicon. The docs list macOS on Apple Silicon. I use a MacBook Air with an M1 chip (2020) running macOS Tahoe. To check yours, open Apple menu → About This Mac: the chip should say Apple M1 or later.
- The running Hermes setup from the last post, including the admin username and password from the Docker Manager (Environment).
- Your server’s IP address, from the VPS overview in hPanel.
- The Terminal app (Applications → Utilities). No extra software needed, macOS ships with an SSH client.
Step 1: SSH from the Mac to the server
1.1 Create a key pair
SSH keys come as a pair: a private key that never leaves my laptop, and a public key that I hand to the server. The server can check that I hold the private key without ever seeing it.
Open Terminal and run:
ssh-keygen -t ed25519 -f ~/.ssh/id_ed25519_hermes -C "mac-hermes-vps"
-t ed25519is a modern, short key type.-fgives the key its own file name, so it doesn’t collide with any other keys.-Cis just a label.
When it asks for a passphrase, set one and store it in your password manager right away. Length matters more than special characters: I used four to five random words (at least 20 characters), generated by the password manager. Since the macOS keychain remembers it (next command), I hardly ever type it. Without a passphrase, anyone who gets hold of the key file can use the key.
Then let macOS remember the passphrase, so I don’t type it every time:
ssh-add --apple-use-keychain ~/.ssh/id_ed25519_hermes
You now have two files: id_ed25519_hermes (private, never share) and id_ed25519_hermes.pub (public).
1.2 Give the public key to the server
Copy the public key to the clipboard:
pbcopy < ~/.ssh/id_ed25519_hermes.pub
Then, following Hostinger’s guide: in hPanel, open your VPS, click Manage, go to Settings, open the SSH keys tab and click Add SSH key. Give it a name (I’d use something like “mac hermes vps”) and paste the key.
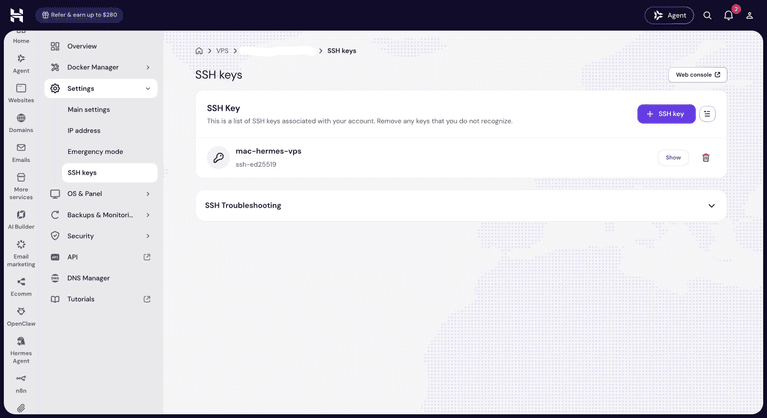
hPanel added the key to my already running server, for the root user. You can check this in the browser terminal with cat ~/.ssh/authorized_keys: my key shows up with the label I gave it in ssh-keygen -C.
1.3 First login
Use the IP address from the hPanel overview:
ssh -i ~/.ssh/id_ed25519_hermes root@<SERVER-IP>
The first time, SSH shows a fingerprint of the server and asks whether to trust it. This is the moment to be a little careful, because whatever you accept now is what your Mac will trust from now on. To compare, open the browser terminal in hPanel and run:
ssh-keygen -lf /etc/ssh/ssh_host_ed25519_key.pub
Both fingerprints start with SHA256: followed by the same string, and they matched, so I typed yes. If they don’t match, stop and don’t connect. Run whoami, then exit.
Why root for now? The server only has a root user at the moment. I’ll set up a normal user and switch off password logins at the end (step 4), once everything works. That way I always have a working way in while I’m changing things.
The firewall rule for port 22 from the last post is what makes this work. No firewall change needed.
1.4 Make it short
Typing the key path and IP every time gets old. I put them in the SSH config on the Mac:
nano ~/.ssh/config
Host hermes-vps
    HostName <SERVER-IP>
    User root
    IdentityFile ~/.ssh/id_ed25519_hermes
    IdentitiesOnly yes
    AddKeysToAgent yes
    UseKeychain yes
    ServerAliveInterval 30
Replace <SERVER-IP> with your real IP address, and remove the angle brackets too. SSH takes whatever is in that line literally, so a leftover placeholder ends in “Could not resolve hostname”.
Save with Ctrl+O, Enter, Ctrl+X, then tighten the permissions:
chmod 600 ~/.ssh/config
From now on, ssh hermes-vps is enough. ServerAliveInterval sends a small signal every 30 seconds, so idle connections (and later the tunnel) don’t get dropped so easily.
Step 2: Open a private path to the Hermes dashboard
The desktop app talks to the same dashboard that I closed to the internet in the last post. I’m not going to reopen it. Instead, I build a tunnel: SSH carries the traffic from a port on my Mac to a port on the server, and to the outside world it’s just one encrypted SSH connection.
2.1 Pin the dashboard port to the server’s own loopback
Remember the random port that Docker had published? A tunnel needs a target that doesn’t change, and I’d rather not have a random door at all. In the Compose file of my Hermes project (Docker Manager → my project → YAML editor), I changed one line:
    ports:
      - "4860"
to:
    ports:
      - "127.0.0.1:4860:4860"
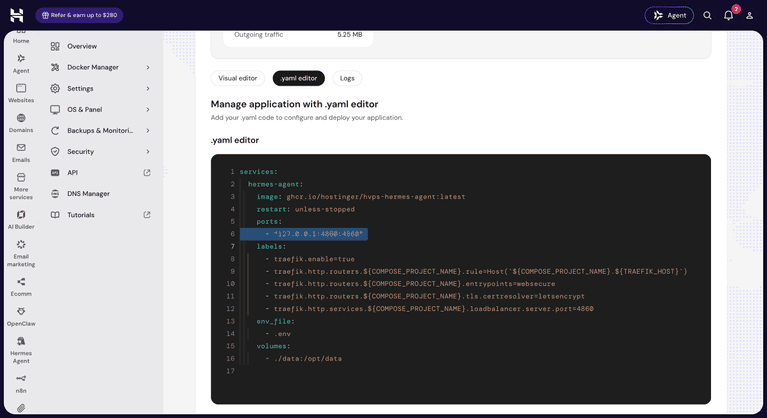
Now Docker publishes the port only on the server’s loopback address, on a fixed port. The firewall already blocked the old random port, so this is belt and braces: the door is closed at two levels now. It doesn’t affect Traefik, which reaches the container through Docker’s internal network. Save and redeploy the project.
After the redeploy, the change was still there.
Verify it on the server (via ssh hermes-vps, this is the host, not the container):
docker ps --format 'table {{.Names}}\t{{.Ports}}'
The Hermes line should now show 127.0.0.1:4860->4860/tcp, and no 0.0.0.0 anymore.
2.2 Open the tunnel
On the Mac, in a Terminal tab:
ssh -N -o ExitOnForwardFailure=yes -L 4860:127.0.0.1:4860 hermes-vps
-Nmeans “don’t run a command, just hold the connection”.-L 4860:127.0.0.1:4860means “whatever arrives at port 4860 on my Mac goes through the tunnel to127.0.0.1:4860on the server”.-o ExitOnForwardFailure=yesmakes SSH quit with an error if the port on the Mac is already taken, for example by an older tunnel. Without it, SSH stays connected but forwards nothing, which is confusing.
The Terminal looks like it hangs. That’s normal, it means the tunnel is open. Leave the tab open. Ctrl+C closes the tunnel.
2.3 Check that it works
In a second Terminal tab:
curl -sS http://localhost:4860/api/status
(-s alone would hide all error messages. With -sS, curl stays quiet but still reports an error like “Failed to connect”, so an empty answer isn’t a mystery.)
The Hermes docs use this same check. In the JSON answer, look for "auth_required":true and "basic" among the auth providers. That tells you the login gate is on, and that the app will show a normal sign-in button.
Mine returned a long block of JSON. The parts that matter: "gateway_state":"running", Discord listed as "connected", "auth_required":true and "auth_providers":["basic"]. So the tunnel works, and it is the same Hermes that answers in Discord.
Bonus: open http://localhost:4860 in a browser on the Mac. That’s the dashboard login page from the last post, now reachable only through the tunnel.
Step 3: Install Hermes Desktop and connect it
3.1 Install the app
Download the app from the Hermes Desktop page and open the installer.

This is not just a thin client. The first launch runs an installer with eleven steps that puts a complete local Hermes Agent on the Mac: it downloads the agent, creates a Python environment, installs the dependencies, adds a hermes command, prepares config and skills, and builds the desktop app. That local agent is the “this device” gateway from the beginning of this post, and it is separate from the Hermes on my server.
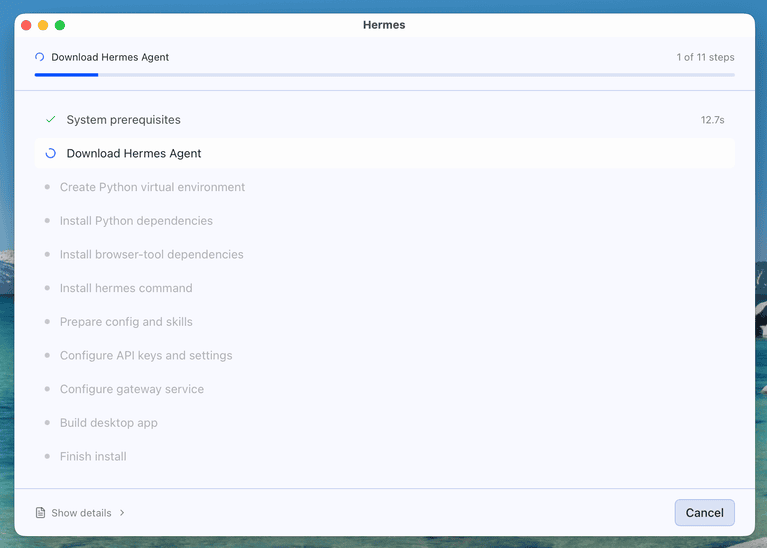
When it finishes, a screen says “Hermes is ready”. Click Launch Hermes (or run hermes desktop in the Terminal later). Two prompts follow:
- macOS asks whether Hermes may find devices on the local network. I clicked Don’t Allow. My connection to the server goes through a tunnel on
localhost, not through my home network. Nothing broke: the connection in step 3.2 worked without it. - The onboarding asks for a model provider. I picked I’ll choose a provider later, because the model login already lives on the server.
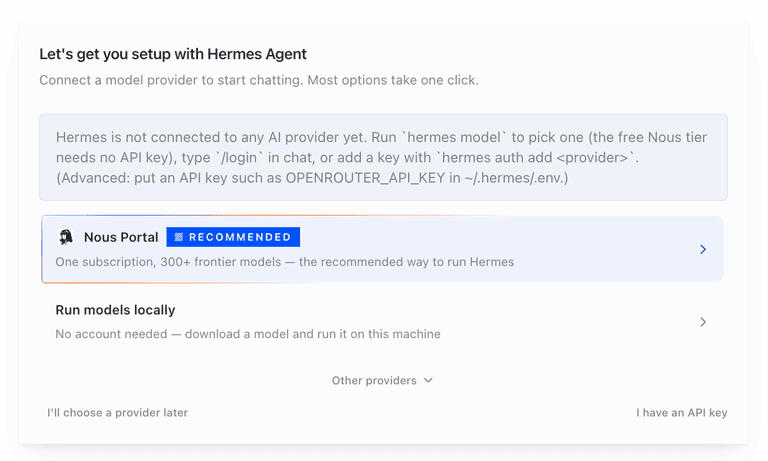
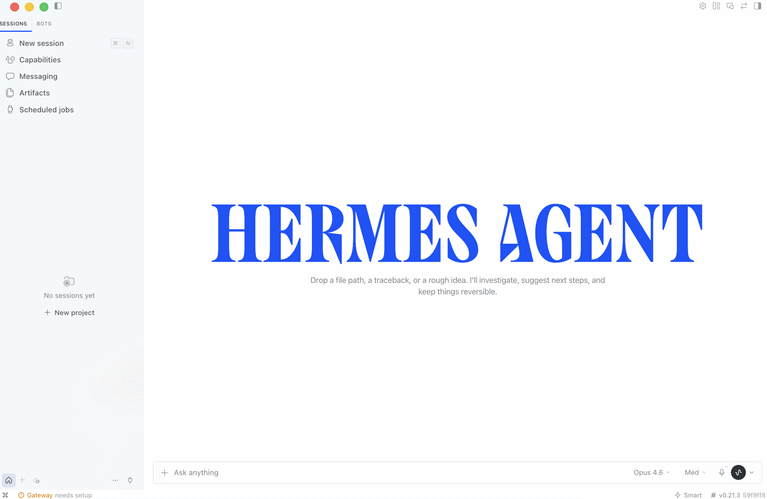
Then the main window opens. The status bar says “Gateway needs setup”, and its popup says “Inference not ready”. As far as I can tell, that describes the local agent on my Mac, which has no model connected. It says nothing about my server. The popup also shows the local backend’s version, v0.21.3, while my server reported 0.21.2 in step 2.3. The app warns about this difference later on, see step 3.3.
3.2 Add the server as a gateway
With the tunnel from step 2 still open:
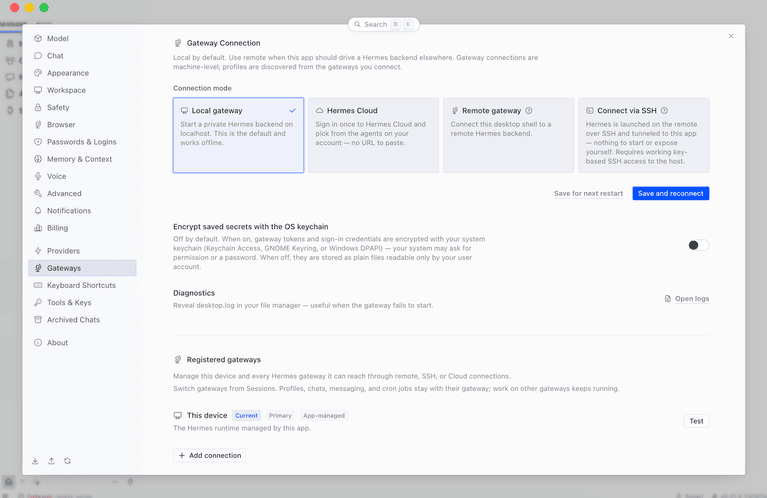
- Click the plug icon at the bottom of the sidebar (tooltip: “Connect another Hermes gateway…”). It leads straight to the Gateways page in Settings. Alternatively, press Cmd+K and type “Gateways”. (The Settings shortcut is Cmd plus the comma key. I first pressed Cmd and plus, which only zooms the window.)
- Leave the four big Connection mode cards at the top alone. They switch the whole app window to another backend, and I want to keep “this device” available next to the server. Scroll down to Registered gateways, click Add connection and choose Remote gateway.
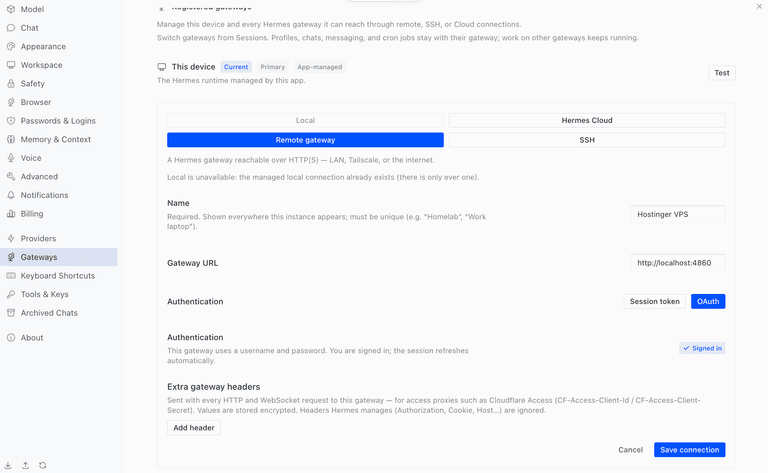
- Name: something recognizable, like “Hostinger VPS”. Every connection needs a unique name.
- Gateway URL:
http://localhost:4860 - Authentication: the form offers Session token and OAuth. I chose OAuth, even though the name is misleading for my setup. The app asks the server which kind of login it uses and then shows the text “This gateway uses a username and password” with a Sign in button. Click it and enter the admin username and password from the Docker Manager (the ones without special characters, see step 2 of the last post). Afterwards the form says Signed in. I didn’t need a session token.
- Click Save connection, then Test on the new row.
The Test checks both the HTTP connection and the WebSocket that carries the live chat, so “Reachable” means chat should really work, not just that the server answered. (Mine failed the first time. See “If the test fails” below.)
What does “Encrypt saved secrets with the OS keychain” do? On the Gateways page, the app has a switch with this name, and it is off by default. While it’s off, the app stores saved logins, like my sign-in to the server, as ordinary files in its own folder on the Mac, readable only by my Mac user account. If you turn it on, they are additionally encrypted with the macOS keychain. The price: macOS may ask for permission or a password, and according to the Hermes docs, a locked or broken keychain can lead to a password prompt every time the app starts. You can try it and switch it off again if it gets annoying.
In my setup the risk is small anyway: the server’s dashboard is only reachable through the tunnel, and that needs my SSH key. More important is the base underneath, full-disk encryption (FileVault) and a screen lock on the Mac, because the login to the server and the SSH key both live on that laptop.
3.3 Prove that it’s the server’s Hermes
The app now knows two gateways: “this device” (the Hermes on my Mac) and the VPS. To be sure I’m talking to the right one, switch to the VPS in the Sessions sidebar, open a new chat and repeat the test from the last post:
Check my current directory and tell me what looks like the main project file.
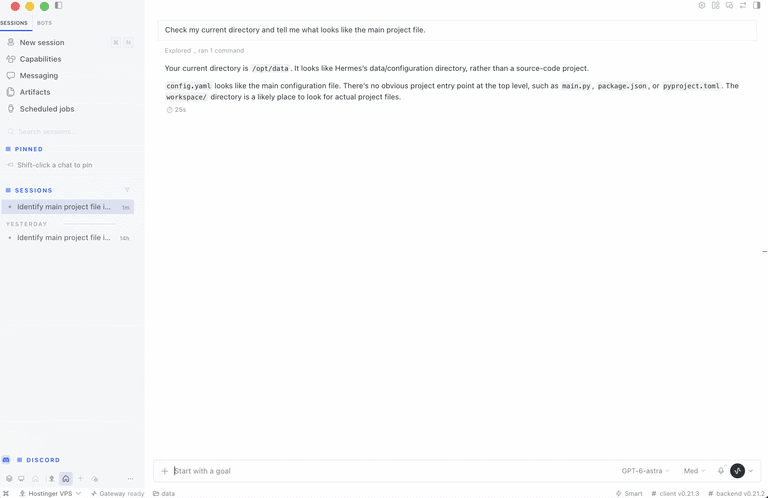
On the server, the answer was /opt/data. If the app answers with a path from my Mac instead, I’m on the local gateway by mistake. Mine said /opt/data again and named config.yaml as the closest thing to a main file, so I’m on the server. The status bar at the bottom also shows which gateway is active (“Hostinger VPS”, “Gateway ready”), which model the server uses (gpt-6-astra) and both versions (client v0.21.3, backend v0.21.2).
“Backend out of date”? While the chat was running, the app showed a hint: “Your Hermes backend is older than this desktop build and may not work correctly.” That is the version difference from step 3.1 (app v0.21.3, server 0.21.2).
I did not click Update Hermes right away. My server’s Hermes lives in a Docker container from Hostinger’s template, and as far as I can tell the app can’t update that in place: the status answer in step 2.3 says
"can_update_hermes":false, and the Hermes docs say Docker installs refuse updates from outside. The button would probably also update the Hermes on my Mac and the app itself. The clean way to update the server would be a new container image through the Docker Manager, and I want to do that consciously, with a snapshot first, not by accident in the middle of a test.The chat worked fine despite the hint, and I dismissed it.
Then have a look around, everything here belongs to the server’s agent:
- Sessions: the chat from the last post (the one from the day before) is listed next to the new one, so both belong to the server’s agent. The sidebar also has a Discord section. I wrote a message to the bot in Discord, and that chat appeared in the app’s Discord section. So Discord and the desktop app really are two doors into the same agent.
- Files: the server’s
/opt/datafolder - Cron, Skills, Channels: the same things I saw in the browser dashboard, now in the app
- The model picker: shows the same model as on the server,
gpt-6-astrafrom step 3.1 of the last post
A warning about the terminal pane. The app has a built-in terminal, but in my layout it was hidden. I found it through the layout button at the top right (Layouts) and the template Terminal deck. To see where it runs, I typed hostname while the Hostinger VPS gateway was active. The answer was my Mac’s name, not the server’s. So, as far as I can tell, the terminal pane is a normal shell on my Mac, even when the app is connected to the server. Anything I type there runs on the Mac.
If the test fails
My first Test failed with this message: “Reached the gateway over HTTP, but the OAuth session was rejected while minting a WebSocket ticket.” So the tunnel and the server were fine (HTTP worked), but the live-chat connection didn’t accept the login I had made in the form.
What fixed it: click the pencil icon on the connection, click Sign in again, then Save connection and Test again. This time it passed. That is also what the message itself suggests.
If it still fails: check that the tunnel is still open. The Hermes docs also list close codes for the chat WebSocket: 4401 means the sign-in ticket wasn’t accepted, 4403 means the request guard rejected the connection, for example because the Host header doesn’t match. With my localhost URL, the Host check didn’t cause any trouble.
Optional: the built-in SSH connection type
For completeness, I also tried the second connection type from the beginning: Settings → Gateways → Add connection → SSH, with root@<SERVER-IP> as the SSH host. According to the docs, the app then opens the tunnel itself and looks for the hermes command on the server, and there is an optional field for its full path.
It doesn’t work with my setup. The Test failed with: “Hermes is not installed on the remote host (could not find a hermes executable)”. The message then suggests two fixes: install Hermes on the server with the official install script, or set the path to the hermes executable. Both miss my situation. Hermes is installed, but inside the Docker container, not on the server itself.
I did not run the suggested install script, obviously. It would put a second Hermes on the server next to the one in the container, with its own memory and settings, and that is exactly the kind of confusion I wanted to avoid. A small wrapper that forwards the hermes command into the container would be another way, but I haven’t tried it, and the manual tunnel does the job. Afterwards, I removed the test connection again.
Step 4: Lock the door behind me
Up to now I connected as root with a key. That works, but the server still accepts passwords, and anyone on the internet can try to guess them on port 22. So now, and only now that everything works, I tighten things up: a normal user for me, no password logins at all, and root only with a key.
One decision first. Root’s authorized_keys contains a #hostinger-managed-key entry (see step 1.2). As far as I can tell, that is Hostinger’s own access key, and hPanel features like the browser terminal might depend on it. So I set PermitRootLogin to prohibit-password instead of no: root can only log in with a key, never with a password. That removes the real danger, password guessing, and leaves Hostinger’s key alone. I haven’t tried no, so I can’t say whether it would break anything.
- Optional safety net: a snapshot. Same as in the last post: hPanel → your VPS → Backups & Monitoring → Snapshots & Backups. Keep the current SSH session open during the whole step.
- Create a normal user (on the server, as root):
adduser <yourname> usermod -aG sudo <yourname>I usesudorather than adding the user to thedockergroup, because membership in thedockergroup is effectively root access. - Give that user my key:
mkdir -p /home/<yourname>/.ssh grep 'mac-hermes-vps' /root/.ssh/authorized_keys > /home/<yourname>/.ssh/authorized_keys chown -R <yourname>:<yourname> /home/<yourname>/.ssh chmod 700 /home/<yourname>/.ssh chmod 600 /home/<yourname>/.ssh/authorized_keysThis copies only the line with my key (found by its label) and leaves out Hostinger’s own key. I first tried to remove Hostinger’s line by hand in an editor, and that went wrong (see “Where I got stuck”). Check the result withawk '{print $1, $NF}' /home/<yourname>/.ssh/authorized_keys: it should show exactly one line,ssh-ed25519 mac-hermes-vps. - Test in a new Terminal tab on the Mac (keep the root session open): change
User roottoUser <yourname>in~/.ssh/config, runssh hermes-vps, thensudo whoami. The login must work without the server asking for a password (if it does, the key didn’t arrive), andsudo whoamimust answerrootafter you enter the new user’s password. Ifsudosays the user is not in the sudoers file, thesudogroup is missing. Group changes only apply to new logins, so log out and in again. - Switch off password logins, and root logins with a password. On the server, as the new user, one command at a time:
printf 'PasswordAuthentication no\nKbdInteractiveAuthentication no\nPermitRootLogin prohibit-password\n' | sudo tee /etc/ssh/sshd_config.d/00-hardening.confsudo sshd -tsudo systemctl restart sshsudo sshd -T | grep -Ei 'permitrootlogin|passwordauthentication|kbdinteractiveauthentication'I useprintfon purpose instead of a multi-line block with<<EOF. If you copy an indented block, the closingEOFis no longer at the start of the line, and the Terminal waits forever with a lone>prompt. (That happened to me. Ctrl+C gets you out, and nothing has been changed at that point.) The file name starts with00-on purpose: as far as I know, SSH uses the first value it finds for each setting, and other files in that folder (for example one from the server’s initial setup) could otherwise win. The last command shows the settings that are actually in effect:passwordauthenticationandkbdinteractiveauthenticationshould sayno, andpermitrootloginshowswithout-password, which is the older name forprohibit-password(root only with a key, never with a password).sshd -tchecks the syntax first, so a typo can’t lock me out. On my server, which runs Ubuntu 24.04, the service is calledssh. On other Linux systems it may besshd. - Test from a new tab:
ssh hermes-vpsmust still work without a password. And a login without my key must fail:ssh -o PubkeyAuthentication=no hermes-vpsshould end with “Permission denied (publickey)”, without the server asking for a password. - Test everything else: the tunnel and the app (step 2 and 3), Discord, and the browser terminal and Docker Manager in hPanel. Everything still worked, including the browser terminal and the Docker Manager in hPanel. I even signed out of hPanel and back in to be sure. That was the part I was unsure about in the last post: whether hPanel depends on SSH access as root.
If something goes wrong: the snapshot from step 1 is the undo point, and Hostinger’s recovery options for the firewall and VPS access are still there.
Where I got stuck
- “Could not resolve hostname <server-ip>” when opening the tunnel. I had pasted the config block with the placeholder still in it (🙈😅😂). Fix: put the real IP address into
HostName, without angle brackets (see step 1.4). curlprinted nothing. Same cause: there was no tunnel, andcurl -shides the error. Usecurl -sS(see step 2.3).- “Address already in use” when I restarted the tunnel. The old tunnel was still running in another Terminal tab. Stop it there with Ctrl+C first. If you can’t find the tab,
lsof -nP -iTCP:4860 -sTCP:LISTENshows which process holds the port (see step 2.2). - Cmd and plus zoomed the app instead of opening Settings. The shortcut is Cmd plus the comma key. Or use the plug icon in the sidebar (see step 3.2).
- Session token or OAuth? The form asks for one of the two, but my server uses a plain username and password. Solution: pick OAuth. The app then shows a normal Sign in button for username and password (see step 3.2).
- “Connection test failed” with “the OAuth session was rejected while minting a WebSocket ticket”. HTTP worked, but the chat connection didn’t accept my first sign-in. Fix: edit the connection (pencil icon), sign in again, save, test again (see “If the test fails” in step 3).
- I couldn’t find the terminal pane. The docs say Cmd+K offers a “spawn a terminal” entry, but my version didn’t list one, and the right sidebar didn’t show a terminal either. What worked: the layout button at the top right, then the template Terminal deck (see step 3.3).
- “permission denied: ~/.ssh/config” when I wanted to edit the file. I had typed only the file name (😶🌫️), which makes the Mac try to run it. Open it with an editor instead:
nano ~/.ssh/config. - The server asked for a password, and
sudosaid I’m not in the sudoers file. Two things had gone wrong: the new user’sauthorized_keyswas practically empty (removing Hostinger’s line in the editor had also removed mine), and the user wasn’t in thesudogroup. Fix: add the group withusermod -aG sudo, and rebuild the key file with thegrepcommand from step 4 instead of editing it by hand. I did this in the browser terminal in hPanel, which doesn’t depend on my SSH login. - Only a
>appeared after pasting the multi-line block in step 4. The closingEOFline had picked up leading spaces from the indented copy, so the Terminal was still waiting for the end of the block. Ctrl+C, then use the one-lineprintfversion instead. - A “Password:” prompt on my own Mac. I had pasted the server commands into a Mac tab, so
sudoasked for my Mac login password. Check the prompt: on the server it reads<yourname>@srv…:~$, andsudoasks “[sudo] password for <yourname>”.
What’s next
Hermes can now be reached from my Mac, privately, and Discord still works next to it. Things I collected for the next posts of Weekend Rabbit Holes:
- The same for my Windows laptop. Different SSH client, same idea.
- Dashboard or desktop app? Through the tunnel, the browser dashboard (
http://localhost:4860) shows more entries in its sidebar to administer than the desktop app does. Is it the same thing, grouped differently, or can some things only be done in one of the two? Which one do I use for what? I want to compare them side by side. - More models. GPT and Claude (via subscription or API), open-source models through OpenRouter, which model fits which agent, and what all of it costs.
- Email, calendar and Drive. As a sandbox, with separate accounts for Hermes and only selected things shared into them.
- Backups. An automated, encrypted copy outside the server, including a test restore.
- What Hermes is allowed to do. Approval mode and tool permissions.
- Keeping the server up to date. The server reports pending Ubuntu updates and a required restart, and the Hermes container is one version behind the desktop app. Updating a Hermes that lives in Docker deserves its own careful walk-through, with a snapshot first.
- A tunnel that doesn’t need an open Terminal tab. Right now the tunnel lives and dies with one Terminal window.
- Tailscale as an alternative to the SSH tunnel. It would let me close port 22 as well, at the price of one more service to trust.
Cheat sheet: using Hermes from my Mac every day
Discord works without any of this. The tunnel is only needed for the desktop app and the “Hostinger VPS” gateway. “This device” doesn’t need it.
1. Start the tunnel in a Terminal tab and leave the tab open:
ssh -N -o ExitOnForwardFailure=yes -L 4860:127.0.0.1:4860 hermes-vps
2. Optional check in a second tab:
curl -sS http://localhost:4860/api/status
3. Open Hermes Desktop and pick “Hostinger VPS” in the Sessions sidebar.
4. When I’m done: close the app and press Ctrl+C in the tunnel tab (or close the tab). The tunnel only exists while that command runs. If the Mac goes to sleep or the network changes, it can drop, and then I start it again.
If something doesn’t work
- “Address already in use”: an old tunnel is still running. Find it with
lsof -nP -iTCP:4860 -sTCP:LISTEN, then stop it withkill <PID>(the number in the second column). - The app can’t reach the server: the tunnel isn’t running. Start it again (step 1). If the connection test then says the session was rejected, open Settings → Gateways, click the pencil icon on the connection, sign in again, save and test.
- I want a shell on the server itself (not the terminal pane in the app, which runs on the Mac):
ssh hermes-vps
Sources
- Hermes Docs: Hermes Desktop
- Hermes Docs: Connecting Desktop to Many Hermes Instances
- Hermes Docs: Web Dashboard (incl. connecting Desktop to a remote backend)
- Hostinger Help: How to use SSH keys at Hostinger VPS
- Hostinger Help: Firewall at Hostinger VPS (recovery)
- Hostinger Help: Back up or restore a VPS